What is Acceptance Test-Driven Development?
ATDD is a development methodology that promotes good collaboration between the business and technology group. Many similar methodologies work more or less the same way like
Behavior Driven Development (BDD), Example Driven Development (EDD) and Specification by Examples, etc.
ATDD is extended to TDD (
Test Driven Development) that emphasizes developers, testers, and business collaboration. ATDD encompasses acceptance testing but highlights writing acceptance tests before writing code. Acceptance Test-Driven Development (ATDD) is a test-first approach.
Why Acceptance Test Driven Development?
One of the main purposes of ATDD is to remove ambiguity from the requirement by writing examples through the collaboration of 3 amigos. Why writing examples by the collaboration of 3 amigos? Because these amigos usually think differently about the same requirement and to align their thought better to write examples.
Why write examples in Gherkin?
Gherkin is the language that many tools understand like Cucumber, SpecFlow and Behave, etc. It is a Business Readable, Domain Specific Language that lets you describe software’s behavior without detailing how that behavior is implemented. You can read more about Gherkin
here.
Gherkin serves two purposes — documentation and automated tests. The third is a bonus feature — when it yells in red it’s talking to you, telling you what code you should write.
10 main keywords help in writing features and acceptance tests/scenarios/examples.
- Feature – To describe feature name and functionality
- Scenario – To describe scenarios of the feature
- Given – Pre-condition for a test/examples
- When – Action to be performed for test/examples
- Then – Expected outcome for a test/examples
- And – Use to write multiples given/when/then
- But – Similar to “And” to describe examples/test
- Background – To write repeated steps for scenario
- Scenario Outline – Used with “Examples” to write multiple scenarios together by having placeholders
- Examples – Multiples scenarios for a scenario outline
Writing feature files for an application
Let’s assume we wanted to develop a Carpool application to share our rides with other people within the organization to reduce traffic and save money.
We need the following features in our application.
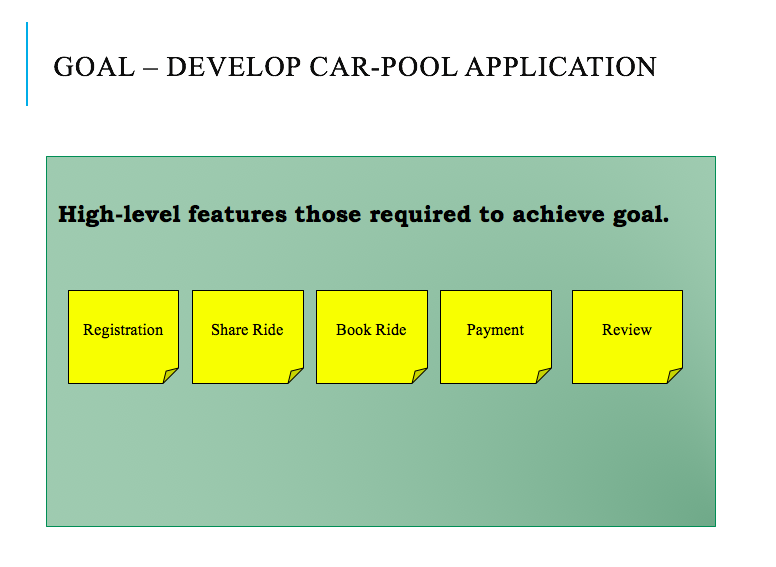
The above features look big we need to further split those to have smaller items for faster delivery and feedback. There are various ways to split big features into smaller releasable functionalities like splitting based on WORKFLOW, OPERATION, BUSINESS RULES, DATA TYPES, and SCENARIOS, etc. I will not be covering those here but will take one example to explain ATDD here.
Let’s assume, we need the below functionalities to complete the “Share Ride” feature.
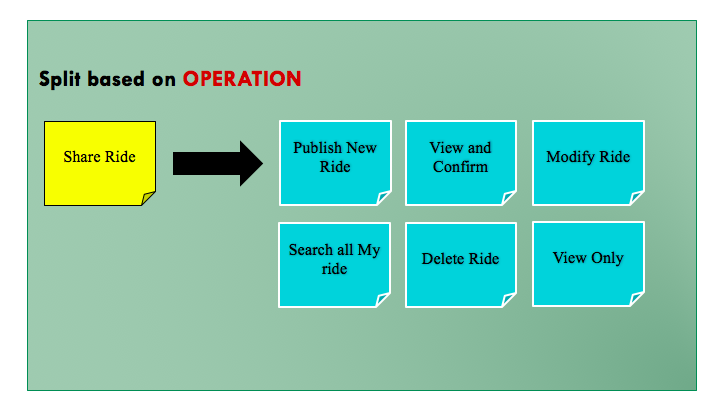
But still, it looks big but there are possibilities to split those further like below for “
Publish New Ride”
- Quick Post – Posting new ride only with a minimum set of requirements
- Detailed Post – Having details like car type, car number, route map etc.
- Re-Post – Wanted to post the same what I have done yesterday
- Recurring Post – Wanted to post the same ride for the next 5 days
- Auto-Post – Automatically picking up my location
Let’s take 1
st functionality as an example to write our 1
st feature.
Feature: Quick Post
To share my car
As a car owner
I want to publish it on an intranet with details like source, destination, time, email, phone no
Scenario: Employee enter valid ride details to share
Given Employee "Naveen" wanted to submit a source, destination and time as "Kammanahalli", "Hebbal" and "5.30 pm"
And "Naveen" email is "naveenhome@gmail.com" and phone no is "+91 9810547500"
When "Naveen" click on "Share"
Then Ride get added and "Naveen" get a message "Ride is shared." with the "OK" button
And "Naveen" get redirected to the home page by clicking on the "OK" button
And "Naveen" can see his ride on top on "Home" page
Scenario: Employee enter ride details to share without email id
Given Employee "Naveen" wanted to submit a source, destination and time as "Kammanahalli", "Hebbal" and "5.30 pm"
And "Naveen" email is " " and phone no is "+91 9810547500"
When "Naveen" click on "Share"
Then "Naveen" get a message "Please add valid email Id"
And Ride not get saved
Practising ATDD using SpecFlow, Nunit and C#
I will be using Visual Studio 2015 with C# and will use the class library project to start with.
Will demonstrate how to practice while creating MVC applications with Selenium and Coded UI in upcoming blogs.
Step 1 – Install SpecFlow
Open Visual Studio and go to Tools -> Extensions and Updates and search “SpecFlow for Visual Studio 2015”
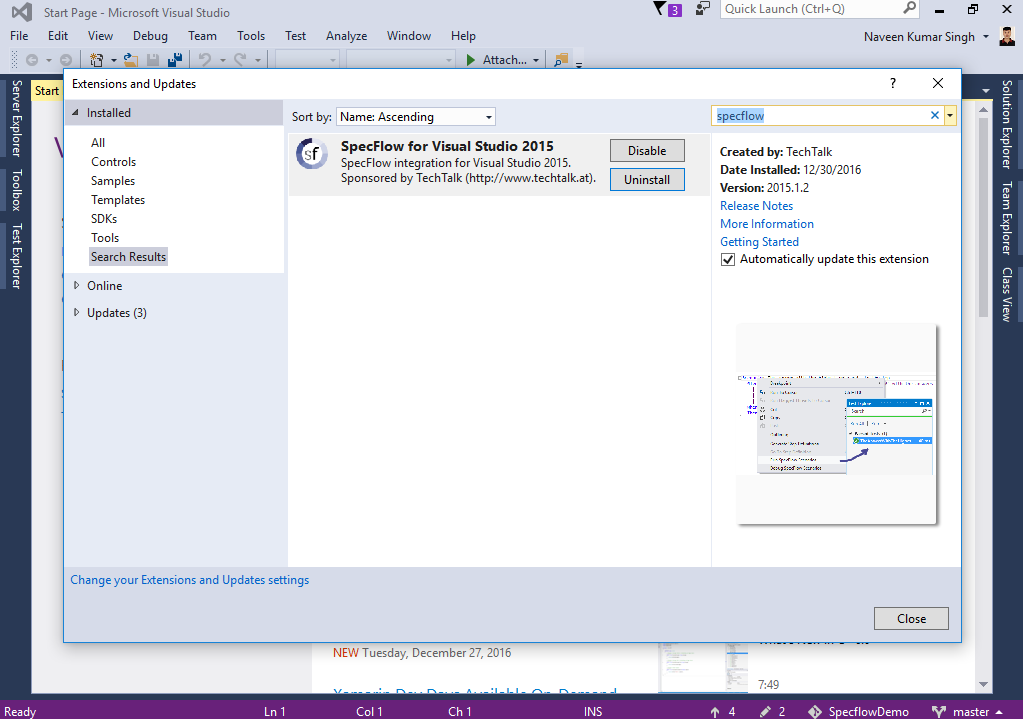
After installation, restart visual studio and create your project by clicking “New Project”. I am going to name it “
Carpool”.
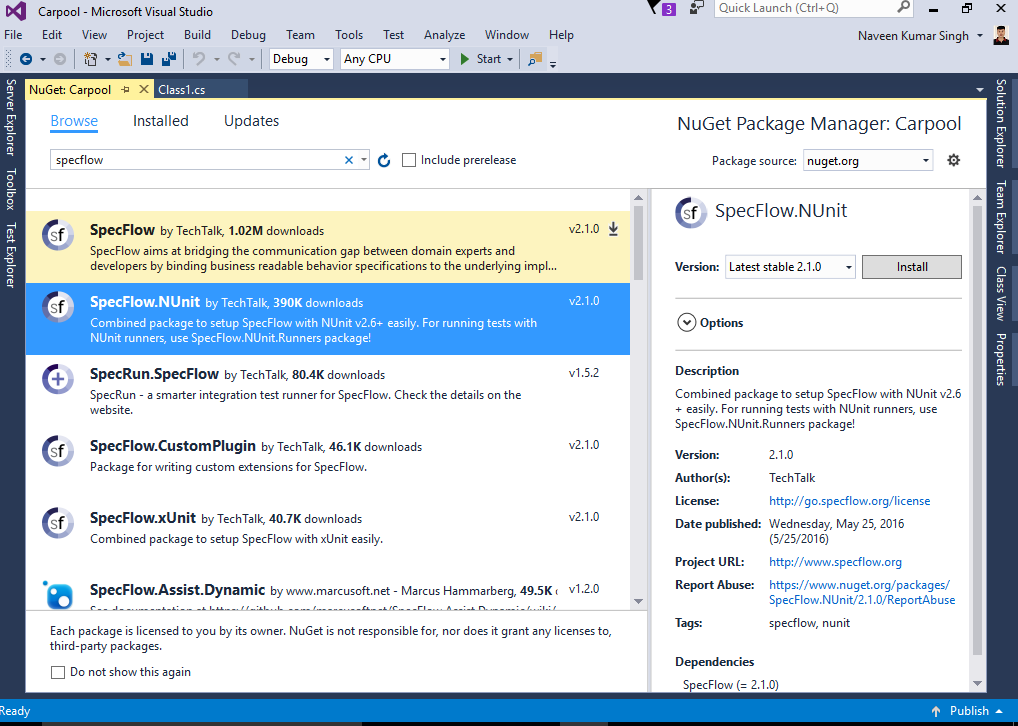
Step 2 – Add SpecFlow and Nunit references.
Add SpecFlow and Nunit reference to your project via “Manage NuGet Packages” like below.
Step 3 – Create a feature file
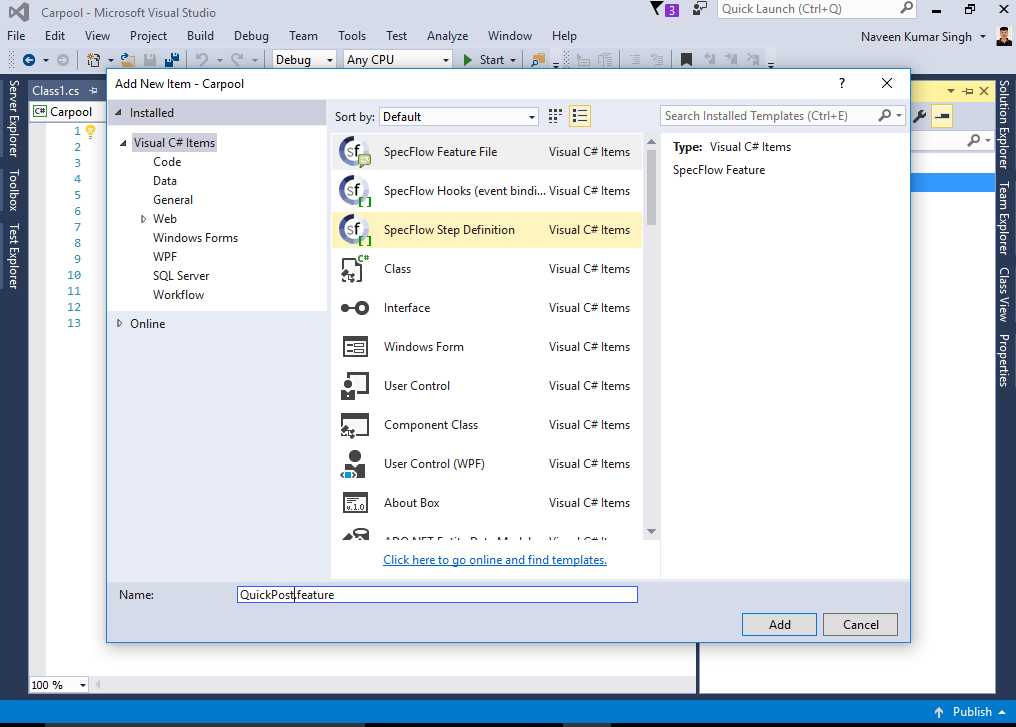
Add first feature file to Project -> Add -> New Items and you will see the option to create a new feature file like below and name it QuickPost.feature. Remove all default content from the feature file and copy the above-written feature.
Step 4 – Generate Step definition
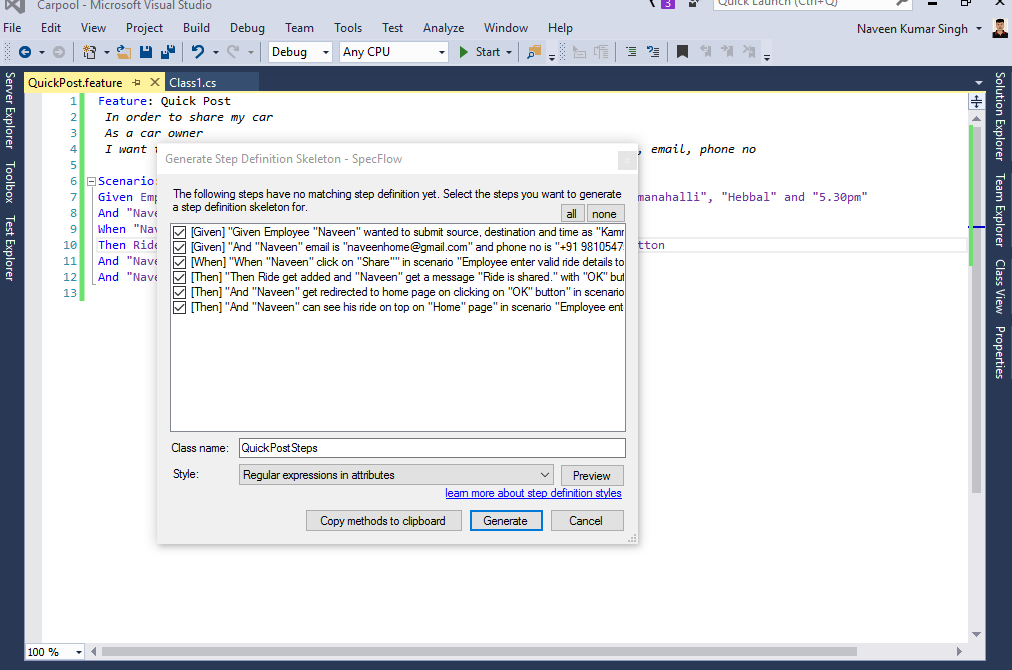
Right-click on the feature file and you will get the option “Generate Step Definitions”. You will get below the screen and click “Generate” here. It will ask you to save your step file in the default location (the same folder where you have a feature file). Save it at the default location and you will find a file name “QuickPostSteps.cs” in your solution explorer.
What is Step Definition in SpecFlow?
To test our scenario, we need to create step definitions that bind the statements in the test scenario to the application code. SpecFlow automatically generates a skeleton for the automation code that we can extend as necessary. Steps are not one to one binding and it uses regular expression. That means if there are similar steps with the same statement in another feature file or another scenario then it will reuse.
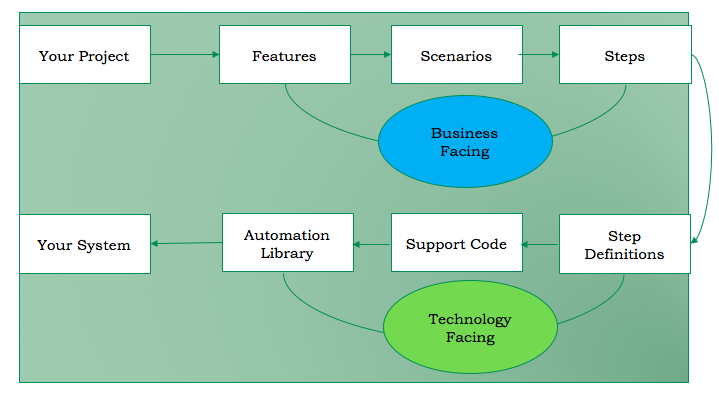
Below ATDD lifecycle explains steps involved in practising ATDD methodology wherein some steps required business involvement and the rest can be performed by the development team.
Step 5 – Run your first scenario
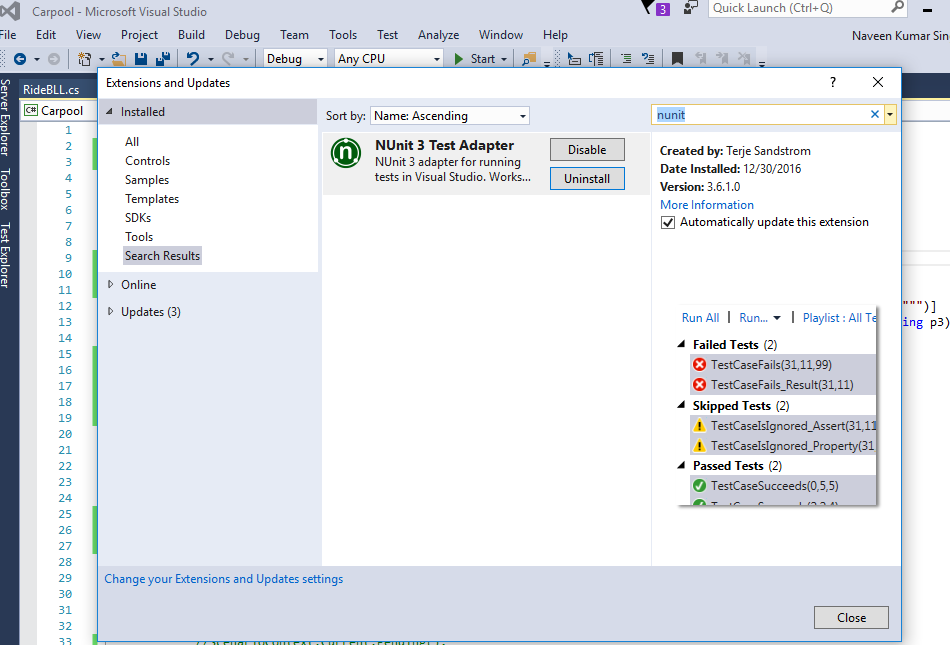
Go to Test -> Window -> Test Explorer and you will find your tests listed in test explorer. If your test not showing that means you need to install an extension called “Nunit 3 Test Adaptor”.
To install it go to Tools -> Extensions and Updates and search “Nunit 3 Test Adaptor”. After installation, restart visual studio and build your solution to see your tests in test explorer.
Step 6 – Writing production code to pass our 1st scenario
I will use Nunit for assertion and will demonstrate how to pass the scenario by adding minimum code just to demonstrate the capability of SpecFlow.
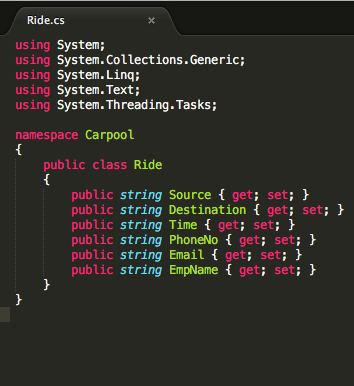
Add a model class called “Ride.cs”
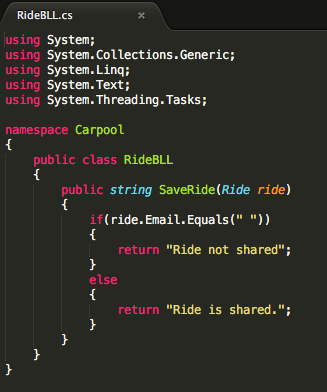
Add another Business Logic class “RideBLL.cs”
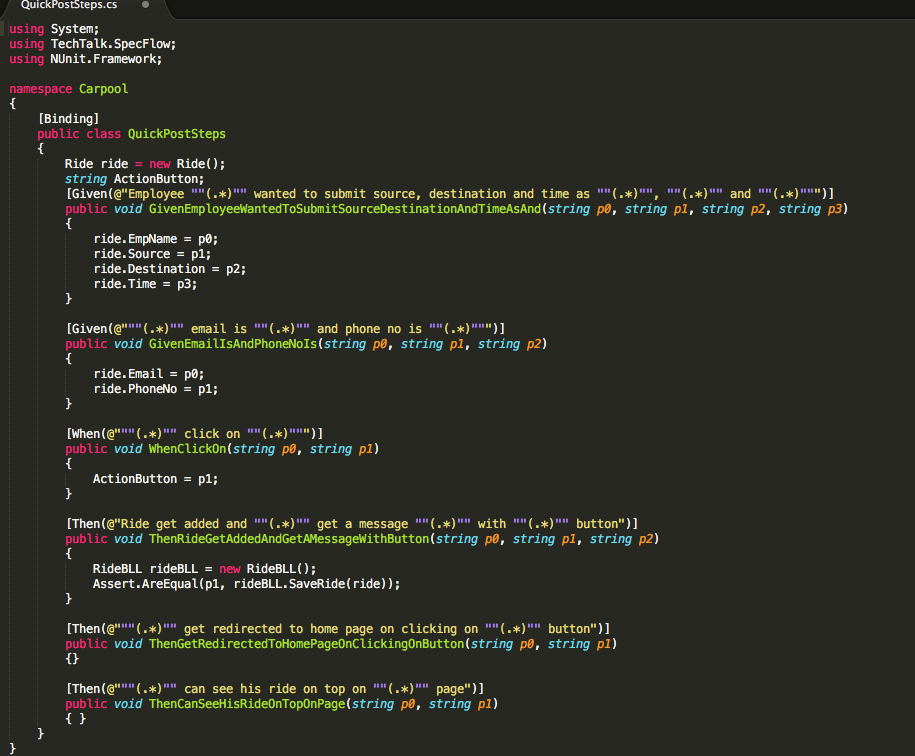
Make changes in the steps file like below: -
Step 7 – Run Tests again
Build your solution again, go to test explorer and click on run all. The test will pass successfully like below.

Try out yourself. If stuck anywhere then reach out to me. I will be happy to help you.

 The above features look big we need to further split those to have smaller items for faster delivery and feedback. There are various ways to split big features into smaller releasable functionalities like splitting based on WORKFLOW, OPERATION, BUSINESS RULES, DATA TYPES, and SCENARIOS, etc. I will not be covering those here but will take one example to explain ATDD here.
Let’s assume, we need the below functionalities to complete the “Share Ride” feature.
 But still, it looks big but there are possibilities to split those further like below for “Publish New Ride”
 After installation, restart visual studio and create your project by clicking “New Project”. I am going to name it “Carpool”.


 Add another Business Logic class “RideBLL.cs”
 Make changes in the steps file like below: -
 Try out yourself. If stuck anywhere then reach out to me. I will be happy to help you.


